When I started (actively) blogging in late 2003 (or was that early 2004?) I didn’t have too much issue with spam, however as my sites became older and gained traffic I also experienced an increase in spam.
Fast forward to the present and the amount of spam I get is ridiculous. Easily over 800+ spammers daily! I’ve written about my dislike of spam before.
Even though the spam rarely makes it’s way on my site, I still find it annoying to see it in my admin panel!
There are many tools available to combat spam and over the years, I’ve tried many.
Earlier today, I did some behind the scenes maintenance to help me combat spam. I renamed my comments.php file and included a few additional rules in my .htaccess file.
Since trackback and pingbacks are the #1 way I receive spam comments, I also installed the WordPress plugin WP-BlackCheck. Even though it’s only been a few hours, I’ve noticed a decrease in the amount of spam I see in my admin panel. The developer is Stargazer, check them out at their site. I’ll keep an eye on the Plugin, but thus far I’m thrilled to see hardly spam in my comments queue.
Are you having issues with my plugins? I’ve logged out and sent some test comments and everything appears to be working properly. But if you run into any issues, send me a note and let me know if you’re experiencing any problems.
Besides the fun aspects of sewing, like creating and designing clothes, sometimes you have to do a bit of maintenance. Over the past week, I’ve done my fair share with pants alterations for my father. I finished the pant legs using the blind hem stitch on my PC-420 PRW.
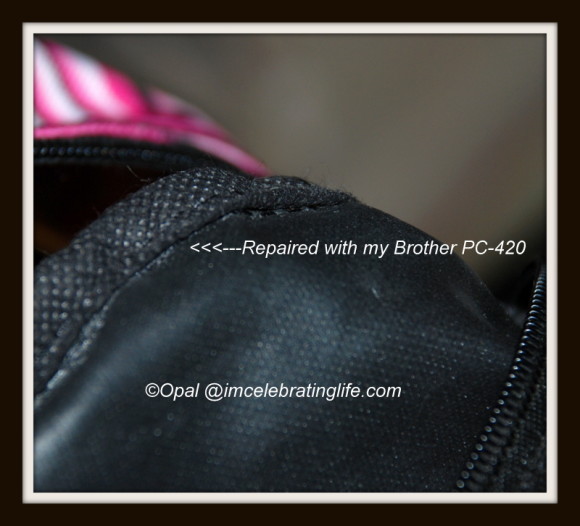
About an hour ago, I did some more sewing maintenance… this time for my daughter.
My Brother PC-420 sewed through multiple layers of fabric without issue.
The front panels of her uniform had come undone and so I sewed that back into place.
My daughter was pleased that her book bag was repaired.
Additionally, her book bag was coming apart at the top of the bag. It’s been repaired.
At times she likes to yank on the bag to tug it out of tight places. Naturally that puts stress on that area, and over time some of the seams came undone. She’s stopped doing that, since I told her not to do that, but I still needed to repair her book bag. I must say, that this store bought book bag was poorly constructed, but that’s a rant for another day…
I was pleased that my Brother PC420, was able to sew through multiple layers of fabric and padding without an issue. In hindsight, I should have taken “before” pictures to accompany the “after” photos.
If you’re already sewing – Stop sewing (right before you start to sew over thick or multiple layer fabric stop sewing).
Raise your presser foot. If you’re already sewing and getting ready to sew over multiple thickness make sure the needle is in the down position (needle still inserted into the fabric).
Push in the black button in before you lower the presser foot. This button holds the presser foot level. When the presser foot is supported by the fabric, the black button will pop out again.
Edited to add…
Don’t forget to use the appropriate needle for sewing through thicker fabrics. I use a 90/14 or 100/16 for the fabrics above.
Last evenings dinner was a lazy meal for us. I tossed a few ingredients in the wok and my daughter ate it quickly.
Vegetable noodle stir fry
I’m not sure what I call this dish… perhaps a vegetable noodle stir fry?
I fried an egg in a little bit of olive oil in my wok. After the egg was done, I added diced garlic, ginger, and chopped broccoli and cauliflower. I let that cook for a few minutes and then added the wheat free pasta. My daughter loved this simple dish and has already put in a request for it again later this week.
I have a picture to share, since I remembered to take a picture before I served the food. I usually remember after the food has been eaten by my daughter. She comes back for seconds and sometimes thirds. Since she’s skinny, I ask her, where are you putting that food? She has a high metabolism, just like me.
Mung bean sprouts
Look, the sprouts are coming along nicely. We sprout a variety of seeds, but these are mung beans. Sprouts are a favorite in our household. We mainly eat them raw.
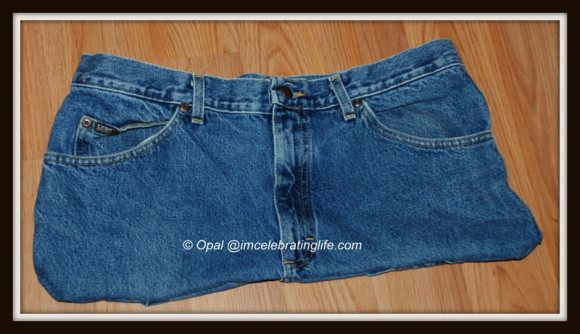
About a week ago, I asked my father did he need anything altered. Naturally, he jumped at that opportunity and gave me some pants that needed to have the legs shortened.
My father has a good hookup anything related to clothing or computers he knows he can usually hand things over to me and it’ll be fixed. When it comes to anything electrical (wiring, televisions, gadgets) he can fix almost anything I give to him also.
I know I’ve mentioned that I’m not too fond of alterations. Also, I have a short list of people that I will I’ll do them for. The rest, get the sorry… I only do alterations for a few people. Good thing he’s on the favored list, right? It’s not that I don’t know how to alter items, I do. In fact, in my early I did altering for a friends boutique. It was great experience. That along with participating in local fashion shows, improved my sewing skills.
My father’s request was minor. He only needed to have the pant legs shortened. That’s simple. I done that stitch by hand numerous times in my 30+ years of sewing. I like the blind hem stitch and use it often with pants leg alterations.
But… if I’m pressed for time or simply don’t want to do alterations by hand, it is nice to have a machine that will do that task.
Blind hem foot
Thanks to the blind hem foot included with my Brother PC-420, I was able to alter my father’s pants without any problems. If you don’t know how to do the blind hem stitch with a sewing machine, check out the above video. I thought the lady did an excellent job describing how it’s accomplished.
I still do the blind hem stitch by hand. I find hand sewing relaxing, and sometimes it’s nice to work on a small project when I’m curled up in a chair chatting with my daughter.
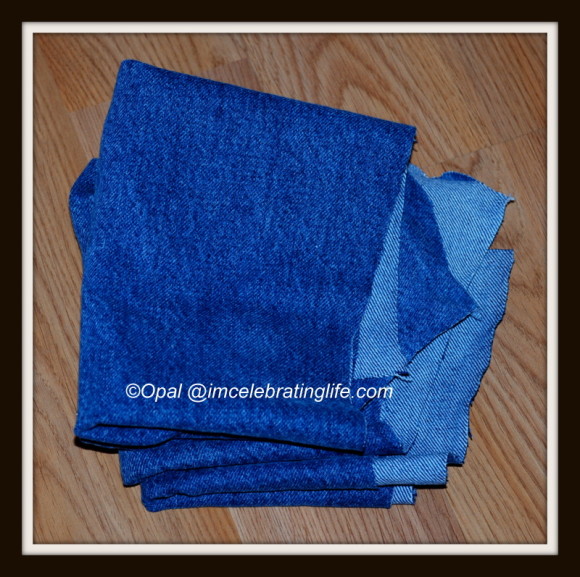
Earlier this evening, I sewed with my Brother PC-420. The fabric used was from repurposed jeans.
Repurposed clothing: These cut up jeans will be used for a few sewing projects
Recently, my father gave me a pair of his jeans. He no longer wears them. I cut them and earlier today I started sewing…
Having read numerous reviews about my Brother Project Runway PC420PRW, I already knew that it should be able to handle several layers of fabric without any issue… and I was right.
Sewing: Jean bag, work in progress
With this “jean bag in progress”, there were several occasions where I was sewing through four layers of fabric at a time! My Brother PC-420 blissfully sewed through all layers without any issues.
My daughter guessed that I was making a bag, and she was thrilled to learn that it was for her. There’s still a lot to do with before it’s finished. I’m going to add an embroidered design; I’ll be using my Brother Se-400 for the machine embroidery.
You want to know something interesting, my Brother PC420 is very similar to some of the Baby Lock machines. It wasn’t too long ago that I learned that Brother manufactures some of the Baby Lock machines.
I’m already familiar with Brother sewing machines… when I was helping to make quilts at our Lutheran church. The church has sewing machines available for the quilting group. The quilting group was my first time working with Brother sewing machines, and I left being impressed with some of the Brother sewing machines. These machines were used exclusively to create machine sewn quilts and they consistently sewed through multiple layers of fabric without any issue.
Since I got the basic stitches covered, I decided to check out the Brother PC-420’s decorative/embroidery stitches…
Theses stitches aren’t elaborate, so if you’re looking for a machine that really embroiders you’ll need to purchase an embroidery machine. For sewing machine embroidery I use the Brother Se-400, it sews and embroiders but I only purchased it for its embroidery features. Even though it can only embroider a 4″x4″ area, I’m extremely pleased with my Brother Se-400.
Brother Sewing machine needle plate
While sewing a few of the decorative stitches on my Brother Pc-420, I almost got the muslin fabric caught under the throat plate! Whoops! The machine wasn’t at fault, it was mine! The design I chose had a lot of stitches in a tiny area. I attempted to do this without stabilizer. If I was using a sturdier material like jeans, I might have been fine… but since I was using muslin the machine wasn’t liking that. Fortunately, I stopped the machine in time before I got a lot of fabric caught under the needle plate. Although I’m still a new at machine embroidery, I know better.
This past week, I’ve put the Brother PC420 sewing machine through it’s paces and it’s doing an excellent job. It’s a computerized machine, which makes. I normally sew with mechanical machines, but I’m enjoying the computerized features that the Brother Pc-420 offers. Such as the automatic thread cutter and needle threader. Who knew something as simple as that, would be a big sell for me? Having the option of selecting stitches using the screen is a nice touch also.
It’s still too early to write a detailed review of this sewing machine, but eventually I’ll get around to reviewing it here on Celebrate Life.
It’ll make a nice blanket to snuggle in, when it’s chilly outside. Initially I had planned the exact colors I wanted for this blanket, but recently I abandoned that idea (even though the end result would have been beautiful) and decided this knitted blanket would be my surprise blanket. I’m really not going to think about the colors I choose. I’ll just pick up a skein of yarn and start knitting. The only requirements is that it has to be worsted weight.
Hmm… how can I claim this itty bitty blanket?
Well look who’s making an appearance! Mr. B! If I let him, he’d be curled under this itty bitty blanket. Sorry buddy, you’ll just have to wait until it’s finished.
Mr. B, begging won’t work! But the yarn is so soft!
As you can see I still have a long ways to go, but I’m not discouraged and thinking there’s no end in sight! When I have a few moments, I pick up this blanket and start knitting.
 Fast forward to the present and the amount of spam I get is ridiculous. Easily over 800+ spammers daily! I’ve written about my dislike of spam before.