Last evening, I was thrilled when I stumbled upon this vintage Collins skirt maker.
The item I won is in like new condition and comes with a yardstick, hand pump, and chalk to mark the hemline. This one was probably made in 1950 or 1960s. I’ll know once it arrives to my house. These were used for making perfect hems and while they still make them now, I much prefer using the vintage design. First you need to mark where you want your hemline to fall with the ruler, then as you turn, you press the pump this ‘marks’ the skirt by marking the area with a thin line of chalk.
Collins Skirt Marker
When it comes to sewing clothes, I mainly used disappearing ink pens but recently I purchased a tailors chalk marker from Joann Fabrics. I love them! The serrated wheel in the tip of the chalk markers makes a very fine chalk line. I most likely will still use the disappearing ink pens for delicate fabrics since I’d be worried about snagging, but for everything else I most likely will be using a tailors chalk marker.
The only thing I was disappointed about was the actual marker. It’s cheaply made and I can already see a crack in the container that holds the chalk. I purchased it this past Saturday!
Chakoner – chalk marker
After a bit of research I found the Chakoner. It’s in the shape of a heart, how cool is that? It has received excellent reviews. Yesterday I purchased one for myself. The powdered chalk should be enough to mark fabric for several years. Even better, I purchased my chakoner from a local lady and she has published a book about tailoring and she also offers advanced sewing classes. So, I most likely will take one of her classes sometime this year.
Last evening, I drafted one costume for the upcoming Passion Play, so this afternoon I most likely will start sewing Mary Magdalene’s costume.
Besides the fun aspects of sewing, like creating and designing clothes, sometimes you have to do a bit of maintenance. Over the past week, I’ve done my fair share with pants alterations for my father. I finished the pant legs using the blind hem stitch on my PC-420 PRW.
About an hour ago, I did some more sewing maintenance… this time for my daughter.
My Brother PC-420 sewed through multiple layers of fabric without issue.
The front panels of her uniform had come undone and so I sewed that back into place.
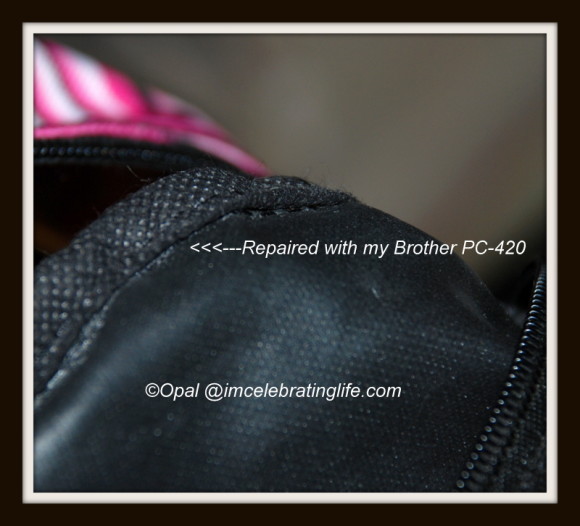
My daughter was pleased that her book bag was repaired.
Additionally, her book bag was coming apart at the top of the bag. It’s been repaired.
At times she likes to yank on the bag to tug it out of tight places. Naturally that puts stress on that area, and over time some of the seams came undone. She’s stopped doing that, since I told her not to do that, but I still needed to repair her book bag. I must say, that this store bought book bag was poorly constructed, but that’s a rant for another day…
I was pleased that my Brother PC420, was able to sew through multiple layers of fabric and padding without an issue. In hindsight, I should have taken “before” pictures to accompany the “after” photos.
If you’re already sewing – Stop sewing (right before you start to sew over thick or multiple layer fabric stop sewing).
Raise your presser foot. If you’re already sewing and getting ready to sew over multiple thickness make sure the needle is in the down position (needle still inserted into the fabric).
Push in the black button in before you lower the presser foot. This button holds the presser foot level. When the presser foot is supported by the fabric, the black button will pop out again.
Edited to add…
Don’t forget to use the appropriate needle for sewing through thicker fabrics. I use a 90/14 or 100/16 for the fabrics above.
About a week ago, I asked my father did he need anything altered. Naturally, he jumped at that opportunity and gave me some pants that needed to have the legs shortened.
My father has a good hookup anything related to clothing or computers he knows he can usually hand things over to me and it’ll be fixed. When it comes to anything electrical (wiring, televisions, gadgets) he can fix almost anything I give to him also.
I know I’ve mentioned that I’m not too fond of alterations. Also, I have a short list of people that I will I’ll do them for. The rest, get the sorry… I only do alterations for a few people. Good thing he’s on the favored list, right? It’s not that I don’t know how to alter items, I do. In fact, in my early I did altering for a friends boutique. It was great experience. That along with participating in local fashion shows, improved my sewing skills.
My father’s request was minor. He only needed to have the pant legs shortened. That’s simple. I done that stitch by hand numerous times in my 30+ years of sewing. I like the blind hem stitch and use it often with pants leg alterations.
But… if I’m pressed for time or simply don’t want to do alterations by hand, it is nice to have a machine that will do that task.
Blind hem foot
Thanks to the blind hem foot included with my Brother PC-420, I was able to alter my father’s pants without any problems. If you don’t know how to do the blind hem stitch with a sewing machine, check out the above video. I thought the lady did an excellent job describing how it’s accomplished.
I still do the blind hem stitch by hand. I find hand sewing relaxing, and sometimes it’s nice to work on a small project when I’m curled up in a chair chatting with my daughter.
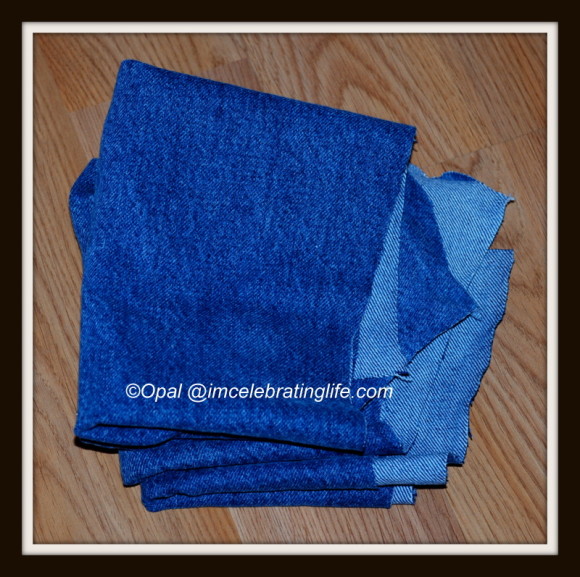
Earlier this evening, I sewed with my Brother PC-420. The fabric used was from repurposed jeans.
Repurposed clothing: These cut up jeans will be used for a few sewing projects
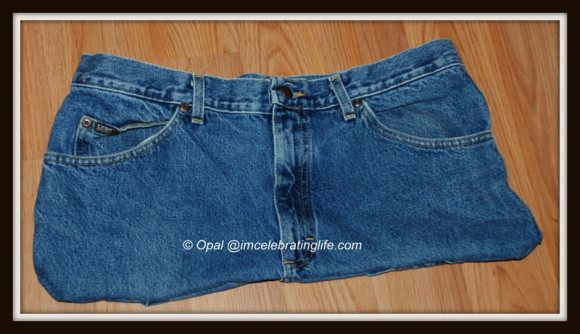
Recently, my father gave me a pair of his jeans. He no longer wears them. I cut them and earlier today I started sewing…
Having read numerous reviews about my Brother Project Runway PC420PRW, I already knew that it should be able to handle several layers of fabric without any issue… and I was right.
Sewing: Jean bag, work in progress
With this “jean bag in progress”, there were several occasions where I was sewing through four layers of fabric at a time! My Brother PC-420 blissfully sewed through all layers without any issues.
My daughter guessed that I was making a bag, and she was thrilled to learn that it was for her. There’s still a lot to do with before it’s finished. I’m going to add an embroidered design; I’ll be using my Brother Se-400 for the machine embroidery.
You want to know something interesting, my Brother PC420 is very similar to some of the Baby Lock machines. It wasn’t too long ago that I learned that Brother manufactures some of the Baby Lock machines.
I’m already familiar with Brother sewing machines… when I was helping to make quilts at our Lutheran church. The church has sewing machines available for the quilting group. The quilting group was my first time working with Brother sewing machines, and I left being impressed with some of the Brother sewing machines. These machines were used exclusively to create machine sewn quilts and they consistently sewed through multiple layers of fabric without any issue.
Since I got the basic stitches covered, I decided to check out the Brother PC-420’s decorative/embroidery stitches…
Theses stitches aren’t elaborate, so if you’re looking for a machine that really embroiders you’ll need to purchase an embroidery machine. For sewing machine embroidery I use the Brother Se-400, it sews and embroiders but I only purchased it for its embroidery features. Even though it can only embroider a 4″x4″ area, I’m extremely pleased with my Brother Se-400.
Brother Sewing machine needle plate
While sewing a few of the decorative stitches on my Brother Pc-420, I almost got the muslin fabric caught under the throat plate! Whoops! The machine wasn’t at fault, it was mine! The design I chose had a lot of stitches in a tiny area. I attempted to do this without stabilizer. If I was using a sturdier material like jeans, I might have been fine… but since I was using muslin the machine wasn’t liking that. Fortunately, I stopped the machine in time before I got a lot of fabric caught under the needle plate. Although I’m still a new at machine embroidery, I know better.
This past week, I’ve put the Brother PC420 sewing machine through it’s paces and it’s doing an excellent job. It’s a computerized machine, which makes. I normally sew with mechanical machines, but I’m enjoying the computerized features that the Brother Pc-420 offers. Such as the automatic thread cutter and needle threader. Who knew something as simple as that, would be a big sell for me? Having the option of selecting stitches using the screen is a nice touch also.
It’s still too early to write a detailed review of this sewing machine, but eventually I’ll get around to reviewing it here on Celebrate Life.
Earlier this week, I promised my daughter we would make some outfits for her Monster High Dolls and her Springfield Doll. The Monster High dolls costumes can be a bit tricky since the dolls are tiny and have an odd shaped body. We sewed all the outfits from repurposed clothing.
Solid Gold dancers
The fabric used for the Monster High dolls outfit was gold, and the color made me think of the show Solid Gold.
My daughter sewed most of the outfit for her Springfield doll. Springfield dolls are the same size as the extremely popular American Girl dolls, but the Springfield dolls are a lot cheaper. They’re sold exclusively at A.C. Moore.
First step was making a simple pattern for her dolls. My nine year old daughter is still new to machine sewing, so I didn’t want to overwhelm her. Once I drafted the pattern, it was cut and pinned to the fabric.
Pattern drafting is easy, once you know how to do it. I started when I was six years old. I’ve had years of practice since most of the outfits I make are created using my own patterns. This fabric is older than my daughter. I’d originally purchased it to make a pair of wide legged pants. I still own and wear those pants.
Springfield doll/American Girl dress
I was so proud of my daughter, with my guidance she sewed the dress. Didn’t she do a great job? My daughter is really thrilled with how this dress is progressing. “It’s much better than the dress she came with mom!” She exclaimed, and she was right. I checked out the original outfit, the stitching was subpar. I’m a sewer, I always look at the stitching (inside and outside).
We both thought the dress was too plain so I drafted a ‘ruffle pattern’ cut it out, gathered it and added it to the dress bottom. This was easily accomplished by setting the machines stitch length to 5. The dress isn’t finished we still need to do a few more things to complete, such as finish the sleeves and we’re still undecided about the collar.
Springfield doll/American Girl dress made from my own pattern
Also a sash will be added to the waist. But we have time… there’s still tomorrow after church.
Bee Paper, 24″ by 50 yards
Since this doll isn’t big, I used plain printer paper to draft my pattern, but when drafting patterns I purchase drafting paper. Why? I like my paper patterns to have some stability. This type of paper is much better than the thin tissue type patter that most of the major pattern companies use. The majority of those patterns are paper-thin and tear quite easily. I much prefer thicker paper. Since I draft most of my own patterns I really don’t have to deal with patterns made on super thin paper.
My daughter loves taking pictures of me when I’m not expecting them. Silly girl!
Brother PC-420
All this was made possible by my Brother PC-420, it arrived this morning. Like my Brother SE-400, it’s self threading. Even through I rarely had a problem threading a machine needle, I’ve grown to really love this feature. I wanted something that was light and portable (most of my sewing machines are heavy) but still was a quality machine (at a reasonable price) that offered a lot of features. My brand-new Brother PC-420 has all of those features.
As with anything, I read numerous reviews about a variety of sewing machines before finally settling on this model. That’s normal, I always research thoroughly before spending money. I purchased an additional three-year warranty in case anything happens to this machine. Thus far, it is doing well. I haven’t had a chance to put it through all it’s paces, but I’ll be checking all 294 stitches tomorrow.
I’ve known about Gingher products for about thirty-six years…
My mother owned a pair of Gingher dressmaking scissors. I was fascinated by them, they were stainless steel, very smooth and oh so shiny! Since the blades were razor sharp, I wasn’t allowed to use them without supervision. After all, I was only six-years old. My mother watched me like a hawk as I carefully cut through fabric. The blades sliced through anything as if it were melted butter. Those scissors aided me in creating a lot of outfits.
Eventually my mother let me have those scissors. I’m guessing because I used them more than she? When I was a child she mainly sewed out of necessity. She didn’t seem to enjoy it as much as myself. The Gingher scissors I inherited from here are small. But, I’ve always wanted to purchase a much larger pair. I just never got around to making that purchase. I mainly use quality rotary cutters for a lot of my fabric cutting, but in some cases nothing beats good quality scissors. Well, my small Gingher scissors will now have a big sister since I purchased much larger pair of Gingher scissors!
I’m willing to spend a bit extra for them since they last much longer than the cheap quality plastic handled scissors you can purchase for a few dollars. Over time, the scissors pay for themselves since I don’t have to keep purchasing those poor quality scissors. I’ve used my Gingher scissors for over thirty years, and am looking forward to using the new pair for a long time also. Great product, excellent company.
No worries, I can always purchase Coats & Clark Dual Duty thread. It’s been the standard thread I’ve used since I started sewing at six years old. Over the years, I’ve been tempted by some of the cheaper quality threads available but after some unpleasant experiences I’ve always returned to Coats.
This weekend, I’ll be working on a few Passion Play costumes and I’ll be designing/sewing a dress for my daughter. My Lutheran church recognizes Lent and her choir will be performing at next Wednesday evenings Lenten service.